Meet My Friend…Dr. Watts. My Goal Zero Yeti 400, Hacked 1200W Power Setup
Here’s How I Squeezed 1200w Of Power Into A 400w Setup
So I bought a big-ass blue 1985 Chevy G10 van with a camper top in hopes of heading off on longer adventures. Yes, my 4-door Jeep Wrangler with a built in bed platform is still my go-to, but I wanted to test Vanlife to go along with my #Jeeplife.
Also, being able to work easier on the road and be a huge hit with the ladies? (Two of the three of those are working out so far… moving on.)
Today I’m going to show you a how-to on my Goal Zero Yeti power setup for overlanding. And in case you’re already well down that road, some helpful tips so that you can get more life out of your current setup!
This site participates in the Amazon Services LLC Associates Program and other affiliate programs and may earn from qualifying purchases.

Hi I’m Jason!
I didn’t even see my 3rd country until age 40, then I was diagnosed with type 1 diabetes at 42…in the middle of Covid. This is where I share personal stories, deep thoughts, and travel shenanigans to encourage and empower others with a fear of travel, or of traveling with major medical conditions, to push through and live an unconventional life!

Use At Your Own Risk!
Hey. I’m no engineer or electrician or magician. Hell, I’m only a mediocre comedian. So if you go and do some crazy frankenstein sh*t with batteries and wires and power and stuff—then end up exploding yourself—it’s on you. Do your research friend!
Oh. Any Yeti doesn’t recommend this (likely to keep sales in their corner…), but it’s being done all over the interwebs. Your call!
***Go straight to the parts and Jeep Wrangler / Off-grid Gear I’m running***
READ NEXT: Sleep In A Jeep Wrangler!? JKU Bed Platform & Storage Step-By-Step How To Build it!
My New Off-Grid Travel Toy
I’ve used this Yeti setup for almost 4 years now without feeling the need to upgrade to one of their newer models. That said, you’ll likely use a newer one, just make sure they have the right ports, etc.
Also, the beauty of this setup is that it fits wherever, since the cords are long enough to put batteries here and there while keeping access to the Yeti ports. I’ve used this when I had a van and in my different Jeep Wrangler bed/storage build setups.
Solar power “generators” on the market; I chose Yeti Goal Zero
There are easily a dozen visible “solar” generators on the market that you can find and compare and contrast the pros and cons. Most all have similar capacities, ports, and possibilities. Because this type of power product is still a fairly new category, the test cases are still a little limited.
Connect & Share This Article
For that, I had to take positive or negative reviews with a grain of salt and realize that it was a bit of a gamble regardless. And I definitely wasn’t going with a traditional gas generator for various reasons I needn’t bore you with here.
No offense Goal Zero, but it wasn’t necessarily that your product was leaps and bounds better than the others based on any research I could find.
But I do give you credit for making a super sexily (is that a word?) designed product before anyone else did.
Yeti has also been throwing some serious marketing dollars at getting their brand out there. As a designer, I respect that. I just hope the product lasts the long haul! (And yes, I paid $30 more for a 3-year warranty.) UPDATE: Almost 4 years and still going strong!
CHECK OUT: Jeep Upgrades & Parts Recommendations
Jeep Wrangler Upgrades & Accessories to Make Your Jeep Life Fun as Hell!
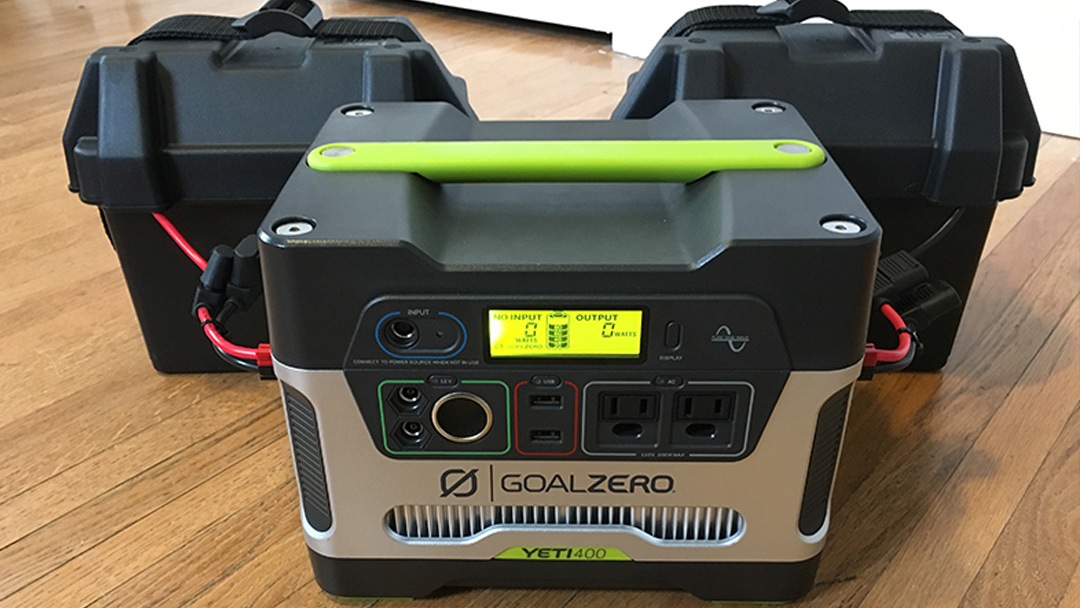
I Started With The Goal Zero Yeti 400 — “Solar Generator”
Like others on the market, this is essentially a super sexy, lipstick-on-a-pig, 33amp battery with a b*tchin’ interface and lots of places for plugs. It’s not too different from something that you’ve probably used for your phone or other devices for a quick charge on the road. But this one’s on steroids and doesn’t fit in your pocket and has many more charging possibilities.
It sports a sexy digital screen that tells you the watts of what power is going into the battery (when charging, regardless of how you’re charging), what’s going out to the things you’re charging, as well as the overall power that’s being held inside of the battery via a 5 bar empty/full gauge.
Goal Zero Yeti 400 Power Ports:
- 2 USB receptacles
- 2 300W max AC receptacles
- a 12V “cigarette” style receptacle
- power input port
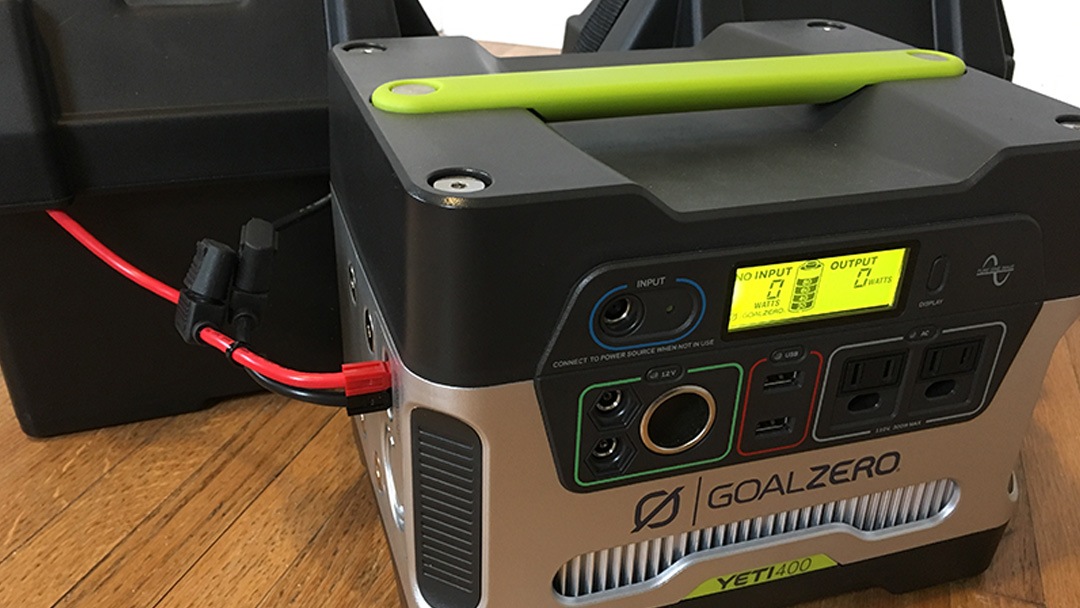
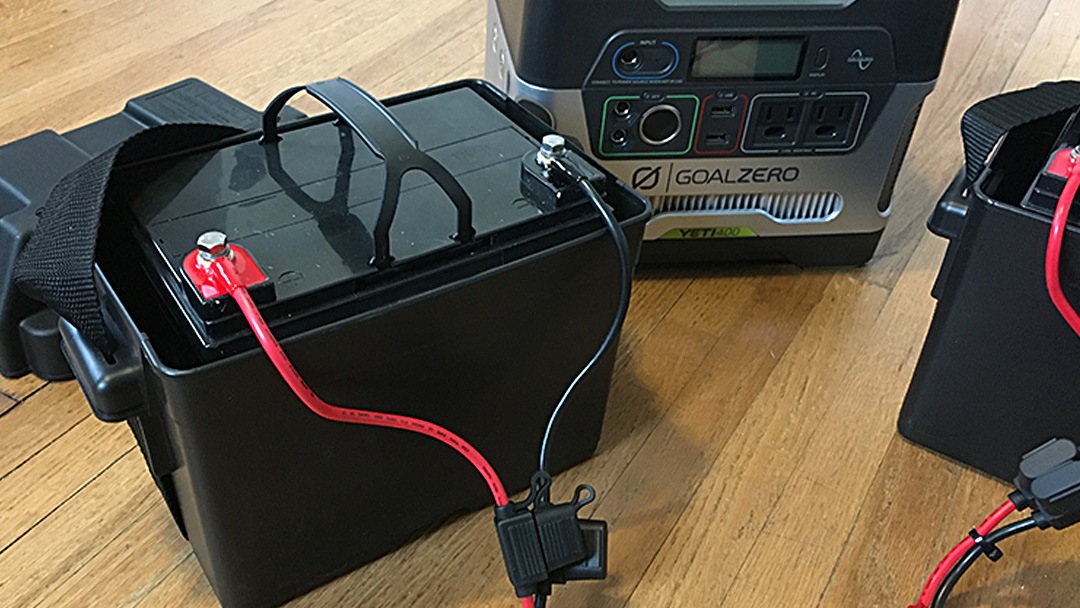
- two Anderson cable connections, one on each side of the battery
Consider that for you to buy typical 33amp hour marine batteries (like these), safety boxes in case sh!t essplodes (like these), Anderson wiring (like this), then a screen (something like these) that tells you want is going in and out of the battery it would run you about $150-200.
For the Yeti 400 (like this) you’re paying about $100-200 more to get this wrapped all in a pretty package and to be able to avoid the work of putting all of your disparate parts together, as well as the mess of wires and whatnot you would end up with.
It’s also pretty nice to look at; have I mentioned that?


Sorry, 400 Watts Is Just Not Enough Power…Now What?
To give you an idea of the power I use, it’s about 85-100 watts just to charge my 15” Macbook Pro from drained to full. And I can blow through a full charge in less than 3 hours when editing video, more like 5-7 hours if just doing word processing stuff (like writing this article).
It’s easy for me to need 1-2 charges of the computer a day if on the road and busting ass on work stuff. The Small 400W from the standard Goal Zero Yeti 400 wouldn’t be enough.
Note, if you ever do work in these conditions, make sure you’re turning off your bluetooth, wifi, and any and all other applications that you’re not using on any of your devices, to avoid wasting power on pesky background activities.
So assuming my computer takes upwards of 100 watts to charge from empty, that setup wouldn’t allow me to be on the road for long. I would burn through the base available charge from the Yeti Goal Zero in like two days.
Join the email list to stay in the loop on new releases!
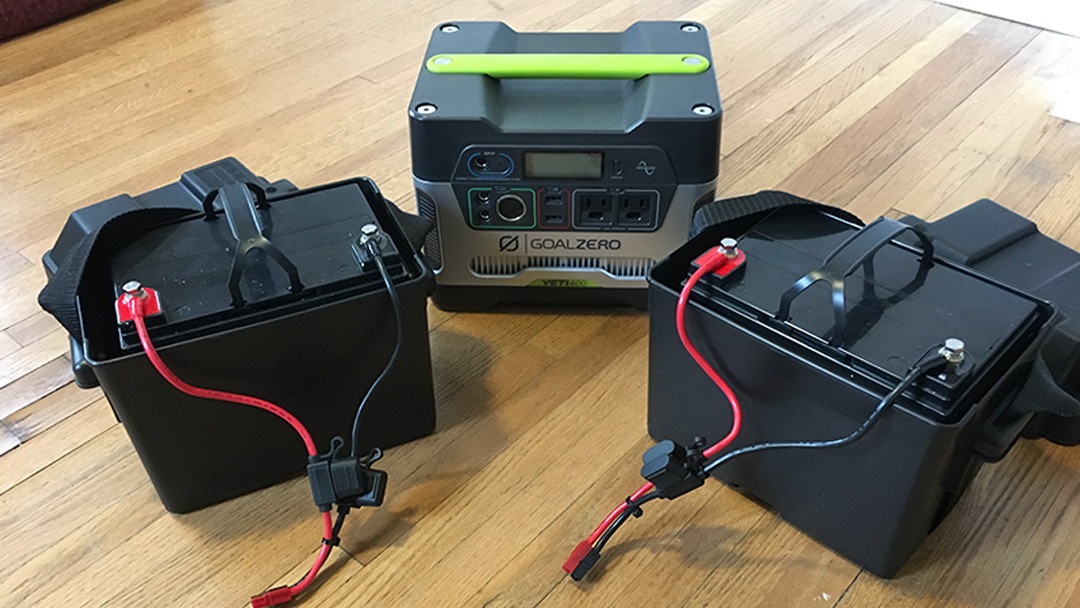
So I chose, after much YouTubing and researching of options, to triple my pleasure. Yes, Goal Zero will sell you two more Yeti 400s and the cords to go between all three…for upwards of $1500! Or you could buy the Yeti 1250 (like this) for a little more and get 1250W of power. Hey, if you’re loaded, go nuts Mr. Moneybags!
I don’t know about you, but I like my money to stay in my pocket for rainy days, cheap campsites, hookers and blow.
Connect & Share This Article
Dr. Frankensteining that sh*t to get 1200W of Power on the Cheap
I chose to add to my Yeti 400 two more 33amp batteries, for which I had to buy two battery boxes, and two Anderson cables to connect the lot. Once I got all of the pieces in my hands, the setup was extremely quick! I literally went to my garage, put them all next to each other, hooked them up, then hooked them up to wall power to make sure I got a full charge topped off before hitting the road.
The Result? MORE POWER. Lots more power.
So essentially what this does is creates one big battery with triple the power, perfect for off-grid travel. Assuming they’re all topped off and you treat this as essentially one big battery when charging or depleting (that’s REALLY important), you’re really working with 1200W of power here at your disposal. Doing the math on my power consumption needs, you can see that I pretty easily have 4-5 days or more of power to work with.
Boom went the dynamite.
(Not really. Nothing exploded.)


Tips & Tricks For Making Your Yeti Frankenstein 1200 Watts (Or Any Other Lead-Acid Setup) Go Further
Think of this power setup as a single unit. Everything I read says that this is pretty important. Essentially if you have one battery that’s lower than the others, you’re bastardizing your power between all of them and they’re working to level each other off while trying to charge your goods. Yeah, doesn’t seem very efficient. Charge them and deplete them as a unit. (Am I the only one chuckling because I keep saying “unit”?)
VERY IMPORTANT! Phase Your Charging! (#NerdAlert…)
Peukert’s Law essentially proves that lead-acid batteries die faster if you’re pulling more/bigger draws from them. To this end, it’s definitely not in your best interest to drain all of your devices and then hook them all up at once to charge.
If you don’t have any devices charging for 3-4 hours and then decide to hook up 2-3 at once, you’re really shooting yourself in the foot.
“The greater the discharge rate, the lower the delivered capacity.” — Peukert’s Law
Click Here for the super nerdy proof.
DO NOT Use Your Computer Or Devices While Charging Them On Your Yeti
I ran some tests with my Macbook. It essentially cut my overally Yeti output in half and gave me much less run time. Even the 1200W DIY setup I’ve created wouldn’t last long at that rate. Based on Peukert’s Law, this makes total sense.
Now I deplete a device and either take an hour or so break while it gets a full charge on the Yeti 400 rig while the device being charged is shut off, or just jump on another device. I’m seeing dramatically more charge potential this way.
Use Your Power Adapters For Larger Devices—Not The USB Ports—When Possible
I’ve run quite a few tests on this thing, and I find that the Goal Zero Yeti 400 USB ports only want to put out about a max of 20W at a time between the two. That may be USB wire capacity, or built into the way the unit works.
Essentially when charging my iPad with only a USB cord and port, it kept jumping on and off with charge. This got me realizing that there’s a reason your larger devices come with a small wall adapter; because they need it.
So I grabbed that little brick for the iPad, plugged it into the AC ports, and problem solved.
Use the USBs for small devices with a USB cord only (those that didn’t come with a brick/plug…) and you should be good to go.
Charge Your Goal Zero Yeti 400 Via A Wall 110v Receptacle When Possible For The Fastest Charge
Yeah, you can charge via solar or the lighter port in your car (with the right cables), but it will always be faster with a wall charge, or maybe hooking up to power at a campsite. They say the Yeti 400 takes about 4-5 hours alone on the wall (and I can attest to that), so adding two more batteries should take three times as long. I’m a genius, I know.
Oh, and there are charts in the instructions that come with the Yeti 400 that speak to the different ways to charge and charge times.
Don’t Deplete Your Yeti Goal Zero 400 Charge Completely
There’s actually an alarm on the Yeti 400 that will tell you when you’re getting too low and need a charge. But I tend to make sure not to get below one bar or 20%. First, it takes a sh*tton of time to charge from empty.
Second, and most importantly, it’s just not good for the batteries. That old myth of deep cycling these batteries and depleting charges should be left on the shelf with the nursery rhymes.
OK. There you go. Please don’t blow yourself up.
But seriously, do your research and be safe! Good luck on your travels!
Cheers!
— Jason


About Jason Robinson
Jason is the author of “The Beginner Traveler’s Guide” as well as the voice behind the words and the eye behind the lens for The Nomad Experiment. “Planning to travel at some point” wasn’t actually getting the job done, so nearing 40 he decided to make it a priority, nomatter how scary that was. A few years later—through the pandemic and a type 1 diabetes diagnosis at age 42—now living a life of nomadic travel, he’s speaking out to encourage others of any age, or with any serious medical diagnosis, to live an unconventional life.
Travel Planning Tips
Figure out where you are going & how are you getting there…
I suggest using at least 2 to 3 different travel search sites. Start with Skyscanner or Orbitz or Booking …or whatever aggregator site you prefer. Then when you see what airlines to use, check their respective sites for better deals or rewards flights.
Figure out where you’re going to stay…
If you’re interested in hostels, search Hostelworld or Hostelling International. For longer-term or more private digs, look at Airbnb, VRBO, colivings, or you can look for hotel rooms in the links from the search engines listed above.
Get comprehensive travel insurance, or in the least, travel medical insurance if internationally…
Especially with COVID not going anywhere, you need travel medical insurance nomatter what! Start with an insurance aggregator or with SafetyWing, World Nomads, or another. Then decide what is important to you; trip cancellation, baggage coverage, medical, or all of the above. And get a yearly evacuation plan, since you’ll have to get home after your emergency!
Need more resources? Click here!